How do I add another AQUILA PRO AI router to my AQUILA PRO AI Mesh network?
You can expand your Wi-Fi coverage by adding compatible AQUILA PRO AI routers or range extenders to your AQUILA PRO AI Mesh network. The add-on AQUILA PRO AI router will function as a Mesh extender in the network. You have options to connect all AQUILA PRO AI devices together with Ethernet cables (wired Ethernet backhaul) or simply have them communicate with each other wirelessly (wireless backhaul).
To add a new AQUILA PRO AI router or range extender, please follow any of the methods below:
Method 1: Wireless Backhaul
Step 1: Connect your mobile device to the existing AQUILA PRO AI Mesh network.
Step 2: Launch the AQUILA PRO AI app, and then log in with your D-Link account.
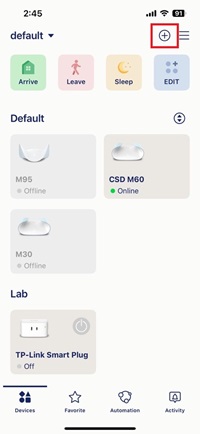
Step 3: Tap to choose the Location where the existing AQUILA PRO AI mesh router is located.
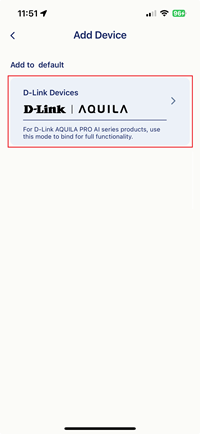
Step 4: Tap “+” icon to add a new D-Link device. Then, tap D-Link Devices.
Step 5: Scan the QR code on your new D-Link device, or tap Add Without QR Code to manually choose a model.

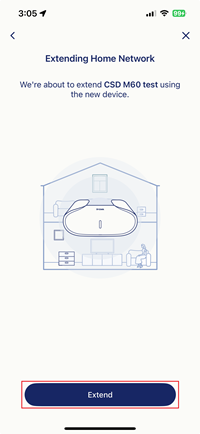
Step 6: Tap Extend to add your new device as a Mesh extender to extend the Wi-Fi network.
Step 7: Select Wirelessly. Your new device will connect wirelessly to your main AQUILA PRO AI router.

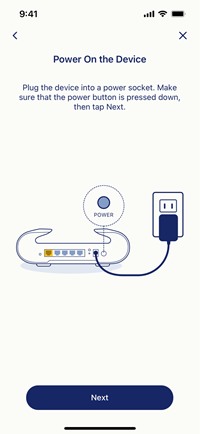
Step 8: Make sure the new D-Link device is close to your existing AQUILA PRO AI router. Then power on the new D-Link device.

Step 9: Wait till the status LED turns Blinking Orange. Then tap LED Is Now Blinking Orange.

Step 10: Your D-Link device is ready to pair with your existing router. Tap Sync to continue.

Step 11: Read the placement tips during the pairing process. Once ready, the new router will function as a Mesh extender to extend the W-Fi coverage. Tap Next to continue.


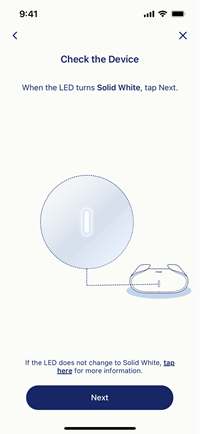
Step 12: Make sure the status LED becomes Solid White, and then tap Next. If the LED shows Blinking White/Orange, please move it closer to the router to acquire a more robust signal.
Step 13: To relocate your device, simply unplug the device and plug it back into an available power outlet. Make sure the status LED turns Solid White. Tap Next to finish the process.

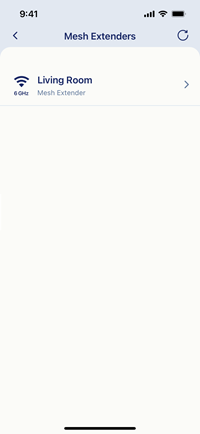
Step 14: You have successfully added the Mesh extender to extend your existing Wi-Fi network. To manage your add-on Mesh extenders, simply go to the Extenders list.

Method 2: Wired Backhaul
Step 1: Connect your mobile device to the existing AQUILA PRO AI Mesh network.
Step 2: Launch the AQUILA PRO AI app, and then log in with your D-Link account.
Step 3: Tap to choose the Location where the existing AQUILA PRO AI Mesh router is located.
Step 4: Tap “+” icon to add a new D-Link device. Then, tap D-Link Devices.
Step 5: Scan the QR code on the new router, or tap Add Without QR Code to manually choose a model.
Step 6: Tap Extend to add your new D-Link device to extend the Mesh network.
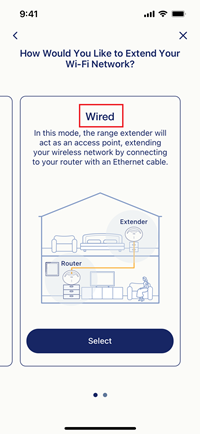
Step 7: Select Wired. Your new D-Link device will connect to your main D-Link router via an Ethernet cable.
Step 8: Use an Ethernet cable to connect the new D-Link device’s LAN port to the existing D-Link router’s LAN port. Tap Next to continue.

Step 9: Power on the new D-Link device. Tap Next to continue.

Step 10: Read the placement tips during the pairing process. Once ready, the new D-Link router will function as a Mesh extender and extend the W-Fi coverage. Tap Next to continue.
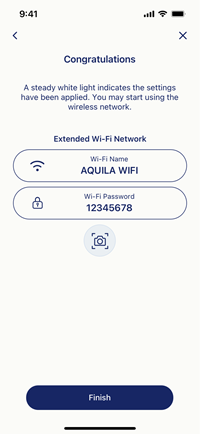
Step 11: Make sure the status LED becomes Solid White. Then tap Next to finish the process.
Step 12: You have successfully added the Mesh extender to extend your existing Wi-Fi network.
Step 13: To manage your add-on Mesh extenders later, simply go to the Extenders list.

Method 3: WPS Button (Wireless Backhaul)
If you don’t use the AQUILA PRO AI app, you can simply pair your D-Link Mesh routers or Mesh range extenders with your existing Mesh router using the WPS button. In this case, your Mesh nodes will be connected via the wireless backhaul.
Note: The latest security encryption WPA3 is not compatible with WPS connection. If you want to add a new D-Link router or range extender to the existing Wi-Fi network of your Mesh router, make sure WPA2 is configured on your existing Mesh router.
Step 1: Plug the add-on D-Link device into a power source near your existing Mesh router. Wait for the Status LED to Flashing Orange.
Step 2: Press the WPS button on your existing Mesh router for 3 seconds.
Step 3: Press the WPS button on your add-on D-Link device for 3 seconds. It may take up to 3 minutes to pair the devices.
Step 4: After the LED becomes Solid White, the add-on D-Link device is successfully connected to your Mesh router.