How to Configure LACP (Copper and Fiber) - DGS-1510-Series and DGS-3420-Series
Topology:
DGS-1510-28X (p25) --- (p27) DGS-3420-28SC
(P26) --- (p28)
In this document we will make the LACP configuration between DGS-1510 and DGS-3420 using the ports of 10G, for this we will use the ports # 27 and # 28 of the DGS-3420 and ports # 25 and # 26 the DGS-1510.
Step 1 - LACP configuration in the DGS-3420-28SC
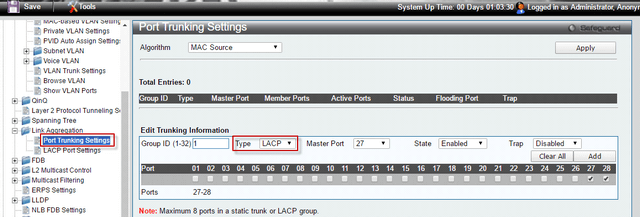
L2 Features > Link Aggregation > Port Trunking Settings
Group ID: 1; Type: LACP; Master Port: 27; Status: Enabled (allow), also click the port 27, 28 then click the “Add” button to create the entry.


Step 2 - LACP configuration in the DGS-1510-28X
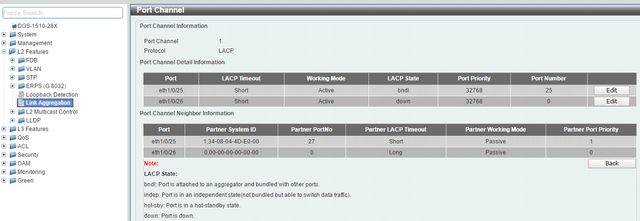
From Port (From the port): eth1 / 0/25; To Port (for port): Eth1 / 0/26; Group ID: 1; Mode: On (Active), then press the "Add" button to create the entry.


We can check the status of LACP by clicking "Detail channel" after finishing the setting.


Make sure to save changes (on both switches) to NVRAM before you complete any reboots to avoid losing your settings.
Configuration LACP between DGS-1510-Series and DGS-3420-Series using a copper port, the configuration steps are the same as steps for 10G.
(Please refer to the manual for the other details of the LACP configuration).
Note: You cannot add different ports to an aggregated link
Ceci peut également aider.
- How to configure VLAN Filter / VLAN Access – DGS-1510-Series Lire la réponse
- DGS-1510 Series How to Configure Stack Order and Priority Lire la réponse
- $name Lire la réponse
- $name Lire la réponse
- How to Configure Link Aggregation LACP - DGS-1510-28 Series? Lire la réponse
- $name Lire la réponse
- $name Lire la réponse
- How to Setup VLANS - Scenario Configuration DGS-1510-Series Lire la réponse
- $name Lire la réponse
- $name Lire la réponse
- How to Upgrade Firmware via HTTP DGS-1510-Series? Lire la réponse